albtechportal

  • Subscribe to our RSS feed.
  • Twitter
  • StumbleUpon
  • Reddit
  • Facebook
  • Digg
Showing posts with label Tutorials. Show all posts

Monday, 2 December 2013

How to Block Websites in Windows 7/8 in Chrome and Firefox Easily

Posted on 03:36 by Unknown
Internet is just like a coin, it has both sides one side for Good things and other side is for bad things.These bad things are highly dangerous to Children,As Children are spending most of their time on Internet they are more prone to Bad things, Here are some ways where you can protect your children from potentially bad things on Internet i.e you can block unwanted and harmful sites on your PC and restrict internet.



block+any+website+easily

Must Check: How to Open Blocked Websites

Step By Step Procedure to Block a Website

Open DNS:
This is a simple way to block adult content and other harmful content on Internet from your children. Open DNS blocks harmful content automatically on your computer.When any one from your computer try to access the harmful sites.
This is a simple way for NON Techie Parents, You can configure Open DNS in simple four steps.check them below
Step 1: 

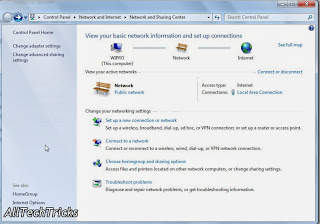
Open Network and Sharing Center and click on Active Connections (From Control panel or by clicking on Network icon from taskbar )
Network+and+Sharing+Center_2

Step 2: 

Click on Adapter Settings, Now select your active network connection device. And Right click on active connection and hit on Properties to open the network device properties.
(Here in our case it Local Area connection)
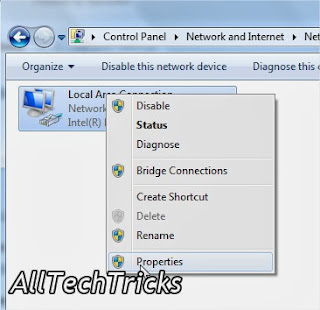
Network+Connectionsp

Step 3:

Now select the Internet Protocol version 4 and hit on Properties

Local+Area+Connection+Properties

Step 4:

  • Now change the option from "Obtain DNS server address automatically" to "Use the following DNS server addresses"
  • Now enter the following DNS server address "208.67.222.123" and "208.67.230.123"
  • Save the settings and reconnect to Internet, Now try to open any harmful website from your browser, to check weather it is blocking or not.
last+shot
Must Check: 10 tips to make PC work Faster

How to Block specific sites on your computer:

Do you want to Block some specific websites on your computer, then you should continue reading this..!!
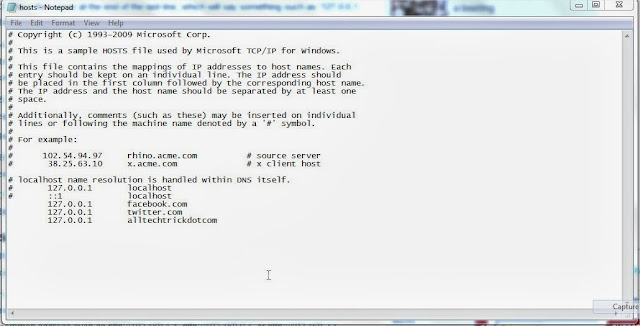
  • Open your "hosts" with notepad which is located Here "c:\WINDOWS\system32\drivers\etc\" and don't forget to open this file with Administrator privileges.
  • After opening the host file with "Notepad". Goto last line of the file and add the websites to be blocked on your computer in this format
127.0.0.1 yahoo.com 
127.0.0.1 facebook.com 
127.0.0.1 twitter.com  

block+sites
  • After adding these lines, you can replace the website address with the specific website address that you want to block on your computer, and save the file.
  • After saving reconnect Internet to take effect in changes, when anyone try to open the blocked website on your computer they will get "Problem loading page" error.
facebook+problem+loading
  • And better to create a new user account on your computer with "Standard Account" type, so that members on your computer will not get in any way Administrator rights.
Source
Read More
Posted in Security, Tutorials | No comments

How to Control your Android Mobile from PC or Laptop

Posted on 03:30 by Unknown
control+android+mobile+from+pc
To Control  Mobile from PC there are many apps available, but not all apps are best here we listed best app to make your work easier.

1.Airdroid for Android:

This is best Android app to transfer files from PC to Mobile for free.If you are ever tried sharing apps and file using Bluetooth and USB cable.

airdroid
Must Check: Control PC with your Mobile
Advantages and Features:
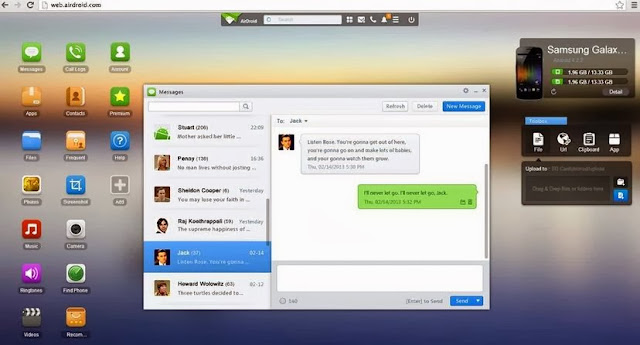
  • Send and Receive SMS from PC.You can also directly talk from PC.
  • Transfer files,apps,photos,videos from PC to mobile wireless
  • Install/Uninstall apps easily and flexibility to take complete back up of your device.
  • Trace your device when you lost it and much more..!!
Must Check: Download S4 and Kitakt 4.4 launcher on your Mobile

Step by Step Process to use Airdroid:

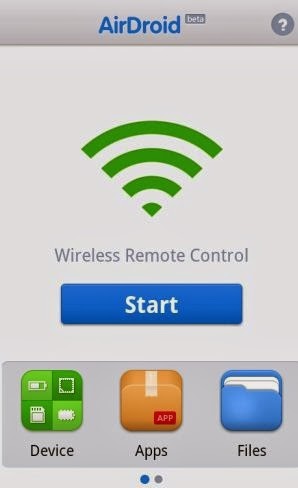
  • Download Airdroid on your device.
  • Now Install and Open app then Click on Start icon.
install+airdroid
  • Now note down the web address after clicking start icon.
copy+webaddress
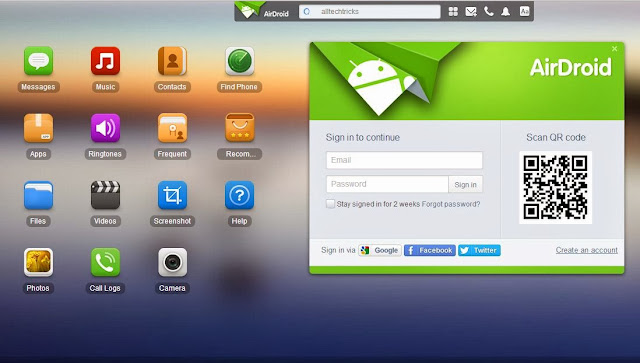
  • Now from PC browser go to web.airdroid.com or in Enter the Web address you copied in previous step.
Note: Make Sure that your device and PC is connected to same Network
open+in+pc
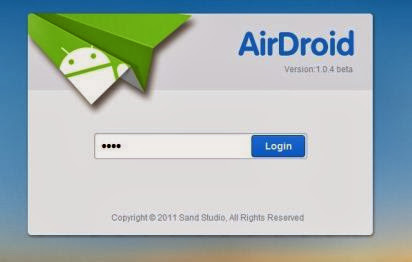
  • If you are going for web.android.com then you need to verify your device by scanning QR code or by entering password.
enter+password
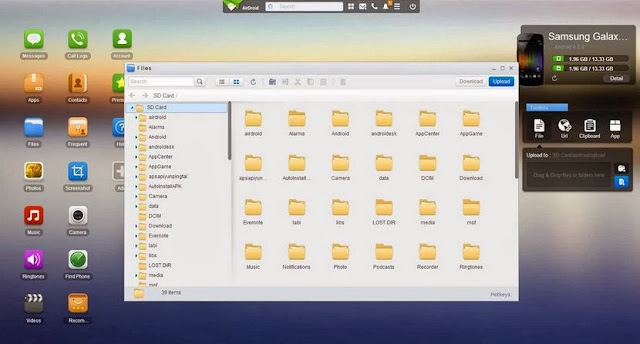
  • Now you have successfully connected your android device to PC.You can start upload files by clicking files logo on desktop,you can chat from your PC and can have full access to your android phone or Tablet.
whatsapp+conversation+from+pcupload+and+delete+files
  • That's it Guys ! there are many features avalible once go through all of them and enjoy.

Here is Quick Video


Source
Read More
Posted in Android, Laptop, Mobile, Tutorials | No comments

Resize Image without loosing Quality

Posted on 03:27 by Unknown
People hate to visit websites which require more time for loading. So one should always seek to improve the webpage load time, so to do so you have to look at many things like loading sources, page cache, media files etc. One among such media file is images, adding beauty to your page, but at the same time, it is regarded as the most bulky resources which takes much time to load on the page, thereby causing inconvenience to the visitors.
But one can improve the page load time by cutting the size of an image to a significant amount. But even resizing the image without any proper knowledge may be troublesome as you may lose the quality it had. Though photoshop provides a nice feature to save the original quality of the pic, it is not preferred much as it’s too expensive to purchase the photoshop application for desktop or web version. So here I’m going to provide you with free online tools to Resize Image without loosing Quality

Web Based Tools to Resize Image without loosing Quality


1.Kraken.io :

JPEG, PNG, GIF, SIV are some of the image formats that can be compressed with this online application. This reduces the image to a quite considerable point without losing the image size.
This application is also available in Chrome and Firefox extensions

2.Imageoptimizer.net:

After uploading the image from your computer, give the size of the image and quality you wish to have after processing. This provides only some control of the output and compression ratio But Greatly Helps to Resize Image without loosing Quality.

3.Smush.it:

Smush.it is the best and popular online application you can have to compress images. It is present with an up-loader as well as URL box to have the image. In this you will not be provided with the ‘enter’ option to enter the image quality as that of previous one because it automatically optimizes the image by compressing it to a limit.

4.Compressjpg.com & Compresspng.com :

I would suggest you to have these application, for more control of the image quality. A slider appears as soon as you upload an image to auto control the quality of the last image. A preview panel is provided for showcasing the changes according to the quality slider change. So before downloading the image you can have the review of your final image. This application is available on different domains for JPG and PNG images.

5.Punypng.com :

This application is available to compress the PNG files. Upload an image and you can get a compressed size of the image. Besides this, tinypng.com , a quick tool to compress the PNG images to the best level without affecting the image quality.

Desktop tool to Resize Image without loosing Quality


If you need a Desktop tool to do this task then i would suggest you to have PNG Gauntlet as your first choice, You will need .Microsoft Net Framework 4.0 to run this tool on your Windows.
Resize Image without loosing Quality
You won’t Face any difficulty in Using this tool as it is very User Friendly. While Optimizing the images PNG Gauntlet will show you older size and Optimized size of the image. this Program is not that Fastest at it work but Usefull.


Source
Read More
Posted in Tutorials | No comments

Saturday, 30 November 2013

Lynda - Up and Running with iOS SDK with Ron Lisle

Posted on 11:59 by Unknown
Lynda - Up and Running with iOS SDK with Ron Lisle

Up and Running with iOS SDK with Ron Lisle
English | .F4V | Audio: aac, 48000 Hz, 2 channels, s16, 95 kb/s (eng) | Video: h264, yuv420p, 960x540, 1148 kb/s, | 952 mb
eLearning
<!--more-->
Creating an iOS application can seem daunting at first. It involves setting up an Apple Developer Account, and learning how to use Xcode and the iOS software development kit (SDK). But taken step-by-step, it's surprising how quickly you can start developing your first iOS app. Ron Lisle introduces you to the tools, terminology, and processes used in iOS development, as he guides you through creating a simple tip calculation application. Learn how to write the code that makes your app run, lay out and connect the user interface, and gather the assets you need to submit it to the App Store. Plus, find out how to install your app onto an iPhone, iPad, or iPod touch and test it to make sure it works.

Topics include:
Installing Xcode
Enrolling in the Apple Developer Program
Creating the UI
Connecting the UI to the code
Handling the keyboard
Displaying data
Performing calculations
Setting up unit testing
Implement the Objective-C code using TDD
Adding an icon and launch image for the app
Submitting to the App Store
Debugging

Screenshots
Lynda - Up and Running with iOS SDK with Ron Lisle

Lynda - Up and Running with iOS SDK with Ron Lisle
If get link die or problem with unrar file , send request to bit.ly/124uJzh
[Rapidgator]
http://rapidgator.net/file/ab60acbc3baee34e9c62b588057c950b/UpanRunningwithiOSSDK.part1.rar.html
http://rapidgator.net/file/6294b9a9bc86debe408d8f925bc931cf/UpanRunningwithiOSSDK.part2.rar.html
http://rapidgator.net/file/dff10ca2edc7079c004ba690d02cb153/UpanRunningwithiOSSDK.part3.rar.html
[Uploaded]
http://uploaded.net/file/35bfyycr/UpanRunningwithiOSSDK.part1.rar
http://uploaded.net/file/yn6rb5js/UpanRunningwithiOSSDK.part2.rar
http://uploaded.net/file/lv6j9rx8/UpanRunningwithiOSSDK.part3.rar
[Secureupload]
http://www.secureupload.eu/9sfbbebl137n/UpanRunningwithiOSSDK.part1.rar
http://www.secureupload.eu/2rcpyt2u7f2u/UpanRunningwithiOSSDK.part2.rar
http://www.secureupload.eu/7lnrc4c9wl6b/UpanRunningwithiOSSDK.part3.rar        


Source
Read More
Posted in iOS, Tutorials | No comments

Friday, 29 November 2013

How to Buy a Business Desktop

Posted on 14:22 by Unknown
How to Buy a Business DesktopBusiness PCs may not be the sexiest players in the PC market, but where the actual number of units the big PC makers ship each year is concerned, they do represent a significant segment. Think about it: You can still write a novel on a typewriter, shoot photographs with film, or play music live and record it with a DAT deck, but very few businesses can get their work done without a PC. Even a mom-and-pop shop that caters to a non-technological audience (say, a buggy whip maker) needs a PC to communicate with suppliers, customers, and potential customers. email, Twitter, the Web: All of these technologies make today's business happen.
While it may be tempting to buy a simple consumer PC from a big-box store like Best Buy or Wal-Mart, you'll probably be doing yourself and your customers a disservice if you do. Specialized business PCs have extra features that make them better suited to the office than the $250 sales-circular special. For one, business desktops are built to last longer, and are usually easier to service, than consumer PCs. After all, the longer a business PC is down, the more money it costs you in lost earning time. Business PC makers may have specialized tech-support lines to help you troubleshoot your QuickBooks problem. At the very least, you can add a service contract to your business PC so that on-site tech-support calls are handled by techs who respond in hours or minutes rather than in days or weeks, like the ones who handle consumer tech support.
The Heart of the Matter: How Much Power?
Dual-core processors, particularly AMD A4 or Intel Core i3 models, are the norm in business PCs, though lower powered netbook/nettop-class processors such as the AMD e-350 or Intel Atom can still show up in really cheap models. Pentium dual-core processors are now the lower-priced desktop CPUs, and use technology from older Intel Core processors. For example, so called low-end Pentium processors are based on the same Sandy Bridge and Ivy Bridge technology that is found in older Core i3 processors. I recommend at least a dual-core processor, whether AMD or Intel, because it's a must for today's attention-challenged, multitasking PC users. Quad-core is an option for the users like graphic artists, hard-core number crunchers, and other gearheads who stress over the speed of their PCs, but dual-core should be enough for non-technical and non-graphics-based users.
Look for at least 4 gigabytes of RAM, and the more memory the better. More memory allows you to do two things: open up more programs and windows at once and perform multimedia processes (like editing photos) faster. It you're the type who keeps 15 tabs open in Firefox or Internet Explorer, you'll need to have more than 2GB of memory. Windows is a resource hog, particularly with the integrated graphics commonly found in business PCs, so 4GB is a minimum (and is recommended even if you're still running Windows XP).
Storage: It's Okay to Go Light
Business PCs require less storage than consumer PCs, since you're less likely to sync your iPod or download lots of video to your work PC. Since storage is so inexpensive these days, a storage capacity of 250 to 500GB is a good balance between economy and space. Frankly, 40-60GB of available storage should be enough for just about all the PowerPoint, Word, and Excel documents you use on a day-to-day basis. Anything beyond that should be stored on an external hard drive or server.
Optical drives are less critical for consumer PCs these days, what with being able to stream multimedia content from the Internet or downloading content directly to hard drives. But a DVD burner is still a must for a small business PC. You may need it to burn copies of projects for your clients, and you'll still need to read the occasional CD or DVD sent to you by a supplier or customer. Look for a full-size optical drive with a tray that opens—it will help for the occasional business-card-size CD that comes your way. (Mini CDs, survivors of a fad dating to the early 2000s, tend to get stuck in a slot-loading drive because of their odd size, and if that happens you have to open up the drive to extract them.) High-speed Internet basically replaced the need to ship large files on optical discs, so Blu-ray is only necessary if you work for a movie company.
High-Powered Graphics Not Necessary
Most business PCs come with integrated graphics, whether from Intel, AMD/ATI, or Nvidia. Integrated graphics are fine for a business PC, since you won't be playing 3D games on the system. (Installing games is the easiest way to make a system unstable, and you don't want your money-earning system to go down unnecessarily.) Tower PCs and most small-form-factor (SFF) PCs will have PCIe x16 card slots for discrete graphics cards, in case you need one. Most businesspeople who require discrete graphics will use them for specialized tasks like GPU acceleration in Photoshop CS6 or 3D graphics visualization for architectural drawings. Ultra-small or ultra-slim form factors will likely have only integrated graphics and no card slots. These systems are best suited to general PC tasks (the majority of business tasks).

Expansion Room: Space to Grow
Most minitower and some SFF value desktops will have a measure of expansion space. You'll find space for at least one extra internal hard drive, PCIe x16 graphics card slot, PCI or PCIe expansion slots, and maybe space for another optical drive. You may find extra DIMM slots, which will let you upgrade your system memory later. Eventual upgrades in a business PC are likely to be modest: the 125W to 350W PSU in these budget systems won't be able to power more than a midlevel graphics card or more than two internal hard drives.
All in One, All Is One
Don't need multiple hard drives and/or multiple graphics cards for your users? Consider deploying all-in-one systems instead of tower PCs. All-in-one PCs have the benefit of a built-in screen without the theft and travel breakage risks that business laptops face everyday. All-in-one PCs are available with high-end performance processors like the Intel Core i7 for your demanding users, but also are available with energy saving processors for everyone else.
How to Buy a Business Desktop - Dell Optiplex 9010
If you choose all-in-one PCs with DisplayPort or HDMI inputs, the screen will be usable, even after the internal CPU and storage become obsolete. Touch screens are useful for certain applications (Kiosk, POS, and information retrieval come to mind), and the all-in-one form factor lends itself to touch-screen computing. It remains to be seen if touch on the PC will be as essential as it is on tablets, but if you're launching touch apps on Windows, you'll probably want to develop for all-in-one desktop PCs.
Where Do Nettops and other mini PCs Fit In?
Nettops and mini PCs belong to a desktop category that comes in below the value desktops, in price (for the most part), size, and capabilities. These systems run on the same basic components as netbooks, their laptop counterparts (low-powered processors, non-upgradable integrated graphics, 1-4 GB of RAM, smaller hard drives or flash storage, no optical drives, Windows 7 or Linux). They're built to surf the Web, run Office apps, and perform other very light computing duties. Unlike full-fledged PCs, these systems have no capacity for internal expansion. One possible benefit, depending on the model, is an included built-in screen for under $450. Nettops and mini PC are best suited for applications where they can sit unattended in a locked cabinet or behind a screen. Examples would include POS (sales) terminals in a retail environment, digital signage, or kiosk use. I wouldn't run a business on a nettop or mini PC, unless all you want to use a PC for is communication. The extra speed of a "real" desktop PC will pay off if you ever have to recalculate a spreadsheet in the 10 minutes before the client arrives, or if you need to quickly retouch a photo or document layout. Besides, tablets like the iPad, Microsoft Surface, and Galaxy Tab are replacing the nettop and netbook as the "low cost computer" even in business. 

Management Details: It's All Small Stuff
The more corporate a PC, the more likely it will have security features (Kensington lock points, TPM, vPro); easy-to-access, IT-friendly components; and remote desktop management tools. You'll need these features only if you're a rapidly growing business or already have more than a dozen employees. Once a business grows beyond half a dozen employees it will need a dedicated IT staffer or subcontractor, and corporate IT features will help that person. If you run a proprietorship or small partnership with just a few employees, then buying more of a budget business PC is fine—just be prepared to face longer waits on tech-support phone lines when things do go wrong. With a small-business-oriented PC, there are usually dedicated sales and technical support personnel who can help you tailor your purchase and support to your business's needs.
Beware Crapware
A downside to cheaper consumer PCs is the specter of crapware. Often one of the reasons a PC is inexpensive is that, as with broadcast TV and "free" cell phones, some other entity is subsidizing the price. Crapware consists of all of those "trial" and extra software that's designed to tempt you into buying stuff that didn't come with your PC. It can be hard to remove completely from your system and can even compromise performance. Although many desktops come with some crapware, manufacturers tend to put more of it into lower-end models.
Fortunately, business PCs, by and large, have minimal crapware. There's almost always an ad for Microsoft Office Starter Edition on the hard drive with a downloadable version of Word and Excel, but in a business system that can be a good thing. You can upgrade to a full version with all the Office programs including Outlook, Access, and PowerPoint simply by clicking the link to Microsoft's site and entering your credit card number. There's usually an antivirus suite as well, but be wary of packages that stop updating after 60–90 days. You don't want to get a virus on the system you depend on to earn your money. Again, this is one case where I'd consider upgrading to the full version over the Internet.
Maybe I Should Have Bought the Extended Warranty
For consumer electronics, most experts recommend avoiding the extended warranty, but for a business PC, the extended warranty can mean the difference between getting your work done today or closing up shop. Most business PCs come with a one-, three-, or five-year standard warranty. Usually means that you tell the PC manufacturer what's wrong, and they'll either ship you a replacement part or send over a repair tech in a timely manner (say 24-36 hours during the work week). If you need a faster response, you can buy warranties for 8-hour response, 2-hour response, or even on-site on-call help depending on your needs. Other options include "keep-your-drive" so your data never leaves your premises, accidental damage protection, data recovery, and even end-of-life data destruction services. It's all at added cost, but like any insurance, whether it is worth it to you depends on what you need to protect.
Final Thoughts
These days, it may be tempting to grab the cheapest system out of a sales circular and call it your "business PC," but don't do it. Keep in mind that this system has to last at least as long as it takes for you to amortize the capital investment (usually three to five years; but the exact length depends on your business's accounting practices). Paying a little extra for more power or capabilities now will save you headaches down the road. The added value of a longer warranty, specialized tech support, and/or the elimination of crapware are among the extra benefits you may get. At the very least, the system you buy from the business division of your favorite PC maker will be more suitable to your company's needs than a flashy silver desktop with a TV tuner and Blu-ray. 

Source


Read More
Posted in Desktop, Tutorials | No comments

How to buy the right sound bar to go with your TV

Posted on 13:54 by Unknown

sound bar


Your HDTV has crappy speakers. Don’t feel bad, they all do. There’s only so much they can do in that thin enclosure with a tiny bezel around the screen. It’s easy to get great sound in your living room, though. All you have to do is buy a receiver, a center channel speaker, a subwoofer, front and surround speakers. Then you take a bunch of speaker wire, and run it from your receiver...
Hey wait come back! I was only kidding about all the speakers and wires. Sure, a nice 5.1 or 7.1 setup will make your living room sound like a little movie theater, but it can also be an eyesore, or at the very least, difficult and expensive to set up. There’s an easier way: buy a sound bar.
A sound bar is a horizontal “bar” of speakers meant to sit right up under your TV. The right one can really make your TV shows, movies, video games, and music sound a whole lot better than they do coming out of your TV’s speakers, and you can get a good one for less than $500—far less than a whole surround-sound getup.
Before you whip out your credit card for the first deeply-discounted sound bar you find on sale, take note of these considerations. As with all audio gear, you don’t have to spend a fortune, but you do need to take heed of certain considerations.

Measure twice, buy once

Your sound bar is going to sit underneath your TV. Make sure there’s room for it. If your TV is in an enclosure, pull out a tape measure and see how wide it is. See how much room you have in front of your TV. Check out deep your TV stand or enclosure is—if you buy a pedestal-style sound bar, you’ll need to know the depth. Nothing would be worse than unboxing your new sound bar at home only to find it doesn’t quite fit where your TV is.
soundbar entertainment center
You want your sound bar to integrate into your entertainment center, not overwhelm it.
Take note of what your TV looks like, too. You don’t have to get a sound bar that exactly matches your TV’s looks, but it helps the sound bar “disappear” if it doesn’t clash terribly with your existing equipment. Some HDTV makers also make sound bars, and they’re made to match the aesthetics of their TV lines. You don’t really need to match this closely if you don’t want to, but the option is there.
Use your smartphone to take a few photos of your TV as it sits in your living room. Some from far away, some up close. Make sure the room is well-lit. That way, when you’re looking around in the store, you can refer to your living room setup and get an idea of what it’s going to look like in there.

Consider pedestal style

There are really two types of sound bars. One is a traditional “bar” a few inches tall and a few inches deep, that sits below your TV, in front of the TV’s stand. Pedestal-style sound bars are typically a foot or more deep, made to be a platform upon which your HDTV rests.
soundbar pedestal
Pedestal-style sound bars are meant to rest beneath your TV.
You’ll want to make sure there’s room for your TV to be lifted up a few extra inches, but pedestal sound bars have some nice advantages. Because of their larger size, they often have enough room for good low-frequency speakers, and don’t need a subwoofer. They also integrate nicely into most entertainment centers, making them harder to notice, especially if your entertainment center is black.

You want a subwoofer

Unless you buy a larger pedestal-style sound bar, do not get one without a subwoofer. A subwoofer is a speaker dedicated to low frequencies, and is absolutely essential to making sure your music has good bottom end, and your movies have good “boom” when things go “boom” on screen.
soundbar subwoofer
You can hide away the subwoofer almost anywhere, but don’t skimp and get a sound bar without one.
I know, I know: the whole point of buying a sound bar was to avoid all the extra speakers and wires. But we’re only talking one extra wire, and you can put the speaker almost anywhere in the room. Low-frequency sounds, by their very nature, are hard to pinpoint the location of. So you can plop that subwoofer by a plant in the corner and discreetly run the speaker wire along the baseboard to it, and nobody will be the wiser.

Look for one with Bluetooth

Imagine: You go into your living room, and decide you want to listen to some music while you have your morning coffee and check your email. But all your music is on your phone. Maybe you like to use Pandora or Spotify. So you pull out your phone, press a button on the sound bar’s remote to flip it over to Bluetooth input, and like magic the music that would be coming out of your phone is coming out of your sound bar.
Criminally, not every sound bar supports Bluetooth. You want to make sure the one you buy does. Streaming music from your phone or tablet is just too convenient, and it’s really easy to pair it with your sound bar.

Inputs? We don’t need no stinkin’ inputs!

Some sound bars have HDMI inputs and output and passthroughs and analog audio jacks and... it’s like the Hair Club for Men with all the plugs back there. You probably don’t need all that. You really need a minimum of inputs.
soundbar inputs
You don’t need a lot of fancy inputs on your sound bar.
First, look at your HDTV’s manual, or dig around behind it. Almost all HDTVs have a digital optical audio output. Buy a sound bar with a digital optical audio input, and just run the audio from your TV to the sound bar. That way anything on your TV, no matter what input it comes in from (cable box, blu-ray player, game console...) will play through the sound bar. Some TVs only have analog audio outputs, which is less ideal, but can still work well and will still give you better sound than sticking with your TV speakers.
Be sure to go into your TV settings and disable your HDTV’s internal speakers, too. You don’t want sound coming out of the sound bar and your crummy TV speakers!

The perils and pitfalls of faux-surround

Some sound bars promise surround sound. It’s a lie. The only way to really, truly get the sensation of sound coming from behind you is to actually put speakers behind you, which sort of defeats the point of a sound bar.
Having said that, some of the “surround” modes on sound bars can give you a wider sound stage and will seem to fill the room better than regular stereo mode. The quality of the surround features on sound bars is all over the map. It often depends on the layout and shape of your living room, and the type of content you’re playing.
As a rule, I would say not to bother with surround modes unless you can listen to the exact sound bar you’re considering in a store, with the content of your choosing, and you think it really does sound good. You don’t have to avoid sound bars with surround modes—they all play in regular stereo just fine—but don’t feel like you have to go out of your way to get this particular feature.

How much should you spend?

Now you know what you need in a sound bar. It has to fit the space, has to have Bluetooth support, has to have a subwoofer (unless it’s a larger pedestal-style bar), doesn’t need a ton of inputs, and doesn’t need fancy surround sound modes.
Only one major consideration remains: price.
There are good sound bars that cost less than $500, but not many really good ones for less than $200. Everyone has a different budget, but that that range should provide some guidance. You can spend well over $1000 on a sound bar, but in that price range, you’re almost certainly paying for frills that may be nice to have, but are hardly necessary.     

Source
Read More
Posted in Tutorials, TV | No comments

How to Protect Wi-Fi network From Hackers

Posted on 13:06 by Unknown
Do you use a wireless network like Wi-Fi at your home or office? And afraid of it getting hacked by other people (hackers)? Now a day hacking has become a key stress or tension for the peoples and are you one among them getting stressed? Then now you don’t need to get worried about it, and let me handle that stress and problem, you just have to do is go through this article and try the stated tips by your own and learn How to Protect Wi-Fi network.
How to Protect Wi-Fi network

How to Protect Wi-Fi network


1.Use WPA:

Many of the WI-Fi connections provides WEP (Wired Equivalent Privacy) for protecting your wireless network, but now a day it can be easily broken/hacked by the hackers by using a simple hacking suite within no time. So to protect your wireless network to the fullest you can use WPA (Wi-Fi Protected Access), and in this you have to make sure that WPS (Wireless Protect Setup) is disabled in the router’s settings. This is the Most Basic and Important Tip to Protect your Wi-Fi Network

2.Use a strong & Secure WPA Password

Always make sure that the password that you select for your wireless network is long and random so that it can’t be cracked/hacked by any kind of hacker. And to test how strong is your password you can use CloudCracker service.
In this service you will be asked some data and that you need to feed in (not the password), and then it will try identifying your password (it’s done in the same way the hacker tries to find out your password), if it fails to find your password then you are ready to use your wireless network and if it finds out your password then you have no other choice left other than changing your password.

3.Separate Network for Guests:

If you are indulged in a business which allows visitors to use your Wi-Fi then it is sensible that you offer a guest network. By doing this the visitors will be able to connect to the internet without getting access to your company’s internal network. This will effectively help you in protecting your company’s information and also from any kind of malware and virus affecting your network or system.

4.Hide your network name

Whenever you get connected with a wireless network first and the foremost thing you need to do is change its settings, as according to the default setting wireless network’s name is broadcasted to make it easy to find and connect. But Service set identifier (SSID) can also be set to “Hidden” so that no one except you will be allowed to view the name of your wireless network. Hence it Helps to Protect Wi-Fi Network.

Conclusions :

With the help of these easy tips you can easilyProtect Wi-Fi network From Hackers. Make sure that your firewall is turned on and you can also use antivirus and antispyware software from Microsoft Security Essentials or Windows Defender on which you can totally trust.


Source
Read More
Posted in Tutorials | No comments

Recover Deleted Files From External Hard Drive

Posted on 13:05 by Unknown
With the easy use of technology today, everything seems to be super fast with availability of anything and almost everything on finger tips. The improvement in technology has definitely changed the way we thought about computers, and the enhanced user friendly interface which provides a much faster as well as easier control of man over his machine.
Recover Deleted Files
The advantages linked with this improvement are innumerable, but every fort when looked closely would show some bits of cracks in one to two bricks. You may have occurred to a thought once in your life that how much the digital data is important in your life and what if you lose it accidentally. Well, then surely you might find yourself engaged into trouble.

How to Recover Deleted Files From External Hard Drive


Below are a few simple steps to help you Recover Deleted Files from some external hard drive.
1.Prevent any further modifications in the drive you need to recover your data from : If you have clicked on the delete button accidentally, and you need to get your data back, then the most important thing you must keep in mind is that you should not try to make any amendments in the files on the drive. This means do not delete any other data, or add any data to the file. Just stop using it, and follow the proceeding steps.

2.Download a file Recovery Software from Internet (Recuva) : Simply browse to Google, and search for some file recovery software online. You will get a good list of results, and you can choose to select any one of them after reviewing their features and other details.

Recuva is one of the most popular applications with some good reviews, and you may try it.
3.Install the Software and Follow the Instructions : Once you find the appropriate software, you may proceed to install it on your system, and then run it. It would then provide you a list of drives connected to your computer. Simply select the drive you need to recover drives from, and start the scan. It would then provide you a list of files which existed on the drive in the past. Depending on the size of the drive, it may take time accordingly.

4.Choose the files : After the list has been generated, all you need to do is tic mark the files you want to recover, or select all if you need them all, and simply click on “Recover” button.

Some other Recovery Softwares to Recover Deleted Files:
Apart from Recuva, there are several other free tools available in the market online which may help you with the Recover Deleted Files The names include Puran FileRecovery, Glary Undelete, SoftPerfect File Recovery, Pandora Recovery, Restoration, Avira UnErase Personal, Free Undelete, ADRC Data Recovery Tools and CD Recover Toolbox.
All these applications are completely free of cost and has a user friendly interface. You may simple type “file recovery software” in Google to catch the best results, or query “download recuva” to directly take you to the download pages.


Source www.smarttricks.net
Read More
Posted in Tutorials | No comments

Create Windows 8 Bootable Pendrive

Posted on 12:57 by Unknown
There are number of ways for installing an operating system to your computer. Most of the people do it by using bootable CD/DVD of windows. But we really don’t need to install windows very frequently and because of this , it is so difficult to put this bootable disc on safe place and remember where you have kept it when needed.
Also , number of times when you are installing window you see some error saying that some of the necessary installation file is missing from the disc and setup can not be continued. All this happens because of scratches present on disc surface since disc is too old to use.
Windows 8 Bootable Pendrive
Apart from all these , Not all Computers have working CD or DVD Drives. This creates a big issue for those who want to install operating system via Disc method,So today here i bring a easy tutorial to Create Windows 8 Bootable Pendrive .

How to Create Windows 8 Bootable Pendrive:


Step 1 :Download Windows 7 USB/DVD download tool and install it.

This tool is available for free from Microsoft Corporation as well so you can get it from there too. Despite its name, this tool works with Windows 8 ISOs as well. You can use this tool for any version of Windows.

Step 2:After downloading and installing the tool, Run it , now you need to Browse and give the path where the ISO  file is located in your computer.
Step 3:Now select whether you want to create a bootable DVD for windows or you want it to be a bootable pendrive. Here you need to select USB device because you want to make bootable pendrive.
Step 4: Browse and select the pendrive which you want to make bootable. Make sure that the pendrive has atleast 4 gb free . Now click on Begin Copying.
windows 8 bootable pendrive

Step 5:
Once you begin copying , the tool will start creating bootable Windows 8 USB installer flash drive using the Windows 8 iso. Let this process complete , lastly when you see the message “Bootable USB Device created successfully”, you can restart your PC and boot from the USB drive.
Hope this tutorial will help you to Create Windows 8 Bootable Pendrive .


Source


Yes this article is all about Trace the lost  laptop, mobile, flight position etc.In past we wrote individual article on each one.Here this article is the collection of all that useful articles at one place.I am sure this is helpful for you so just check below and leave your comment.
trace+everything

Trace the Following:

  • Trace Lost Android Mobiles
  • Trace Lost Laptops
  • Trace Live Flight Position
  • Trace Sent Email
  • Trace Unknown mobile number with name

1.Find your Lost Android and Iphone:

Now a days this is most worried issue.We have solution for this friends now you can find stolen android mobile with this Awesome apps . Download Here

2.Find Name of Unknown Mobile Number

This is one best article so far I have ever written this helps you to trace name of unknown mobile number. you can find those who are calling and Pranking you.
  • Download Mobile Number tracker with Name

3.Retrieve Stolen Laptops:

Now-a-days all the important information is being stored in the personal or office laptops. Once they are stolen, everything is gone. Some people may also loose their jobs because of this issue. If you are worried about loosing your laptop or it getting stolen, you have to install a tracking device on your device so that you can trace it back if it goes missing.
  • Download Software to Find Lost Laptop.

4.Track Sent Email:

Are you confused whether the mail you sent is read or not? Then here is simple trick to track the email you sent as soon as person opened you mail you get notification mail that your email is read.
  • Hers is Step by Step Process to Track Sent Email

5.Track Flight Live Position: 

This is something interesting then the above four.This is awesome you can find live position of any Flight.Interesting right?
  •  Check Here How to Track Flight Position
- See more at: http://www.alltechtricks.com/2013/11/trace-stolen-lost.html#sthash.5YX9DZE5.dpuf
Yes this article is all about Trace the lost  laptop, mobile, flight position etc.In past we wrote individual article on each one.Here this article is the collection of all that useful articles at one place.I am sure this is helpful for you so just check below and leave your comment.
trace+everything

Trace the Following:

  • Trace Lost Android Mobiles
  • Trace Lost Laptops
  • Trace Live Flight Position
  • Trace Sent Email
  • Trace Unknown mobile number with name

1.Find your Lost Android and Iphone:

Now a days this is most worried issue.We have solution for this friends now you can find stolen android mobile with this Awesome apps . Download Here

2.Find Name of Unknown Mobile Number

This is one best article so far I have ever written this helps you to trace name of unknown mobile number. you can find those who are calling and Pranking you.
  • Download Mobile Number tracker with Name

3.Retrieve Stolen Laptops:

Now-a-days all the important information is being stored in the personal or office laptops. Once they are stolen, everything is gone. Some people may also loose their jobs because of this issue. If you are worried about loosing your laptop or it getting stolen, you have to install a tracking device on your device so that you can trace it back if it goes missing.
  • Download Software to Find Lost Laptop.

4.Track Sent Email:

Are you confused whether the mail you sent is read or not? Then here is simple trick to track the email you sent as soon as person opened you mail you get notification mail that your email is read.
  • Hers is Step by Step Process to Track Sent Email

5.Track Flight Live Position: 

This is something interesting then the above four.This is awesome you can find live position of any Flight.Interesting right?
  •  Check Here How to Track Flight Position
- See more at: http://www.alltechtricks.com/2013/11/trace-stolen-lost.html#sthash.5YX9DZE5.dpuf
Read More
Posted in Tutorials, Win8 | No comments

5 things to look for in an 802.11ac router and adapter

Posted on 11:50 by Unknown

There are definitely some things you should look for in both the router and adapters.


Back of Netgear D6300 modem router
The back of Netgear’s D6300 modem router. You’ll notice there is both an ADSL port and an Ethernet Internet WAN port, so it’s ready when the NBN comes along.

Upgrading to the new 802.11ac wireless will likely double your current 802.11n performance — even more so if you’re on one of the older 802.11n standards (like 300Mbps and 150Mbps) or 54Mbps 802.11g.
So, you’re not messing around and want to jump straight to the best wireless network available right now? Yes, you’re prepared to face the early adopter’s fee in exchange for knowing that your wireless network will be viable for years to come. It’ll offer super-fast local file transfers and won’t prove to be a bottleneck to super high-def video transmissions from the NBN.
If that’s the case, getting the right 802.11ac will be crucial for the long term viability of your network. There are definitely some things you should look for in both the router and adapters. Here, we explain what to look for in an 802.11ac router and adapter.

Five things to look for in an 802.11ac router:

01 1,300Mbps speeds

1.3Gbps is the current top speed for 802.11ac routers. When the spec was launched last year, some of the initial units came out only supporting 867Mbps, meaning they had just two spatial streams instead of three (each spatial stream adds 433Mbps). We might still see some 867Mbps routers appear, the same way we still see 300Mbps 802.11n routers, but we figure if you’re going to go all out and set up an 802.11ac network, you may as well enjoy the best it has to offer. As an aside, in some cases you may see routers advertising a 1,750Mbps transfer rate. Don’t be fooled by these. It’s a bit of marketing legerdemain, where vendors take a dual-band router and add the bandwidth of both bands together, even though a given wireless station can only use one band at a time. What 1,750Mbps really means here is 1,300Mbps for 802.11ac in the 5GHz band, and 450Mbps in the 2.4GHz band for 802.11n.

02 A Gigabit WAN port

You may still be on ADSL right now, but in the future you’re likely to be moving to the NBN. The NBN requires an Ethernet port for connectivity. That WAN port has to be Gigabit to support NBN speeds. Fortunately, an increasing number of routers support ADSL now and have an additional Ethernet WAN port, making them NBN-ready. Some other routers may allow you to reconfigure one of the LAN ports as a WAN port. That’s less desirable (since you effectively lose a LAN port), but it will get the job done.

03 Dual-band support for 450Mbps 802.11n

Let’s face it: most of your wireless gear won’t support 802.11ac for some time. Your tablets, laptops, mobile phones and Wi-Fi capable cameras will still be 802.11n for months or years from now. Fortunately, every 802.11ac router released so far supports dual band and is backwards compatible with Wireless N. If you’re going to have to support Wireless N for your ‘legacy’ devices, you may as well support the fastest form of it, and that’s 450Mbps.

04 A vendor that can supply both adapters and routers

802.11ac was still a draft standard. It’s possible that some vendor incompatibilities will linger until everybody can patch their devices to be fully interoperable. Until that happens, there may be some issues getting products from different vendors to work together. When we tested the first batch of 802.11ac routers a few months ago, we had some problems getting devices from different vendors to interoperate smoothly. Some talked just fine, but others were unusually slow or couldn’t ‘see’ the wireless network. We’d recommend a one-vendor solution for now, so you can be sure everything works.

05 Something you won’t hate being visible in your home

As we’ll explain in a little bit, if you want the best speeds you’re going to have to put the router somewhere with an unobstructed line of transmission to your wireless gear. We’re guessing if you want 802.11ac, you also want the best speeds, and that will mean putting the router somewhere where people wandering around your house might see it.

Best 802.11ac router:

  • Netgear D6300 Modem Router


Five things to look for in an 802.11ac adapter

So you have your shiny new 802.11ac router. Now it’s time to update your wireless gear to support the new standard. The best way to do that is through an adapter, which for now are few and far between, though more are sure to come.

01 Support for 1,300Mbps

Your router runs at 1.3Gbps, so you want your adapter to as well. This can be tricky. We’ve yet to see 1,300Mbps USB adapters for example (the current ones work at 867Mbps), but there are bridges and PCIe adapters that work at the top speed. In some cases then, you might have to settle for something slower, but if you can find a way, go with 1,300Mbps.

02 Positioning options

For the best reception, you want to be able to position the adapter away from the laptop or electronic equipment it’s attached to, and you want to be able to angle and lift it. A thumb drive designed to stick out of the side of your laptop can’t do that, but a USB device with a stand and extension cable can.

03 USB 3.0 ports

Unaccountably, the first USB 802.11ac adapters only offered USB 2.0 ports for connecting and sharing drives. We say unaccountably, because USB 2.0 is not fast enough to support the full speeds of 802.11ac transmission. Even the minimum spec of Wireless AC runs at 867Mbps; USB 2.0 runs at a maximum of 480Mbps. At very close range, that means that USB 2.0 has the chance to bottleneck your wireless performance.

04 Bridging to multiple devices

If you’re going with 802.11ac and plan to use it to link fixed position devices like gaming consoles and TV sets, why not look to a bridge, rather than a USB solution. A bridge takes data off the airwaves and puts them on a wired link and vice versa. Bridges like the Linksys WUMC710 allow you to actually hook multiple wired devices into your new 801.11ac wireless network.

05 Fast, dual-band Wireless N support

You probably won’t always be using the device on your own wireless network. You still want it to have fast wireless support for when you’re away from home, since that’s what most other networks will be using for a year or so.

Source
Read More
Posted in Tutorials | No comments

7 ways to maximise your Wi-Fi speeds

Posted on 11:49 by Unknown

So you have your new 802.11ac or 802.11n routers and adapter ready to go. Now you just have to set up your home for optimal wireless performance.


Reception from a vertical antenna works better than horizontally
Wireless, you see, is a fickle beast. A million factors affect the performance of your wireless network, and you can’t just plonk the router anywhere and expect it to work at optimum speeds and reliability. Here are seven ways you can ensure good performance.

01 Range is the most important factor in wireless performance

Nothing affects the speed and reliability of a wireless connection like the range between the access point and the devices that use it. The closer they are, the better. For that reason, you want the wireless router to be placed at the epicentre of your wireless activity, rather than at the periphery. In general, that means putting it somewhere physically close to the middle of your house or unit, rather than hidden in a corner room or buried in the attic or basement. If the location of your broadband connection dictates where you have to put the router, you have several repositioning options. The easiest is just to extend the cable of your broadband connection. If you’re on ADSL, phone cables are cheap, and you just need to buy a longer one in order to reposition the router. An alternative is to have a separate modem and access point. You can buy either a dedicated wireless access point or a wireless router that you’re only going to use as an access point. Then you run an Ethernet cable from a LAN port on your modem router to a LAN port on the access point to give wireless devices access to the modem.
 

02 Think about what the wireless signal has to go through to get from point A to point B

This is too often neglected when people are setting up their wireless network. Wireless signals can travel through walls and other objects, but the success at which they do so it determined by the composition of the things it has to go through. Travelling through plaster and wooden interior walls is easy, for example, but beaming through double brick or concrete is not. Some of the things that will rapidly reduce the strength of wireless signals include:
  • brick walls
  • tiles and mirrors
  • lead-based paints
  • concrete
And then there are your complete show stoppers, including:
  • metal plates and chicken wire in walls
  • water (for example, fish tanks)
If you have these kinds of walls and surfaces in your home, you need to think about positioning your wireless router to minimise their impact. Putting it next to a fish tank, for example, will likely create a large shadow in the wireless reception area. Angles are important too. You want the signal to travel through solid material for as little time as possible. If a wall between the router and adapter is at an oblique angle to the line between the two, there will be more signal loss than if the wall is perpendicular to the line between the access point and receiver. That’s because the signal has more solid material to pass through.

03 Verticality

So you live in a multistorey home, or you have the idea to put the router in the ceiling, under the floor or in the basement. This is a tricky business, because the angle of the antenna can make a big difference. A standard dipole antenna (the kind that sticks vertically up out of the back of a router) for example, has roughly even coverage on a horizontal 2D plane around the antenna. Above and below the antenna are weak points where signal reception won’t be as good. If you put the antenna in a vertical position, you won’t get as good reception 2m above it as you would 2m to the side. In short, you don’t get even spherical coverage from any antenna you find in modern routers. That can make the vertical positioning of the router a tricky proposition. It’s definitely not a good idea to put the router in a basement or in the ceiling, because if you were standing directly above it or below it, your reception may be off. In fact, if you live in a large multistorey home, it’s often a good idea to set up multiple routers (one for each floor), and connect them via an Ethernet cable. Of course, it’s hard to know the exact alignment of antennae when your router has them internally like so many do now. In many cases, you’ll have to engage in a little trial and error when it comes to vertical position of your routers. Try rotating, tilting, wall-mounting and other positions to see which get the best reception.

04 Choose a band

802.11n routers and can work in either the 2.4GHz or 5GHz radio frequency spectrum. A little bit of experimentation might be required to work out which works best for you. As a rule, 2.4GHz has better range characteristics and travels better through walls and other materials thanks to its lower frequency. It’s also more compatible; not every 802.11n device supports 5GHz, but they all support 2.4GHz. But it’s also highly congested, with baby monitors, security cameras, cordless phones, wireless headphones and much more using the same spectrum. And then there’s vulnerability to 2.4GHz interference from microwave ovens. 5GHz, on the other hand, is pretty much only used by Wi-Fi, and you may get better performance on it in your home. As we said, experiment. Maybe run a few file copy tests to see how each performs. If you use 802.11ac, you don’t have a choice. 802.11ac only uses 5GHz (though most devices will also support 802.11n in the 2.4GHz band for ‘legacy’ compatibility).

05 Choose a channel

The 2.4GHz and 5GHz bands are broken into discrete 20MHz channels. That’s done so multiple Wi-Fi devices can coexist in the same area without stepping on each other’s toes too much. If you live in an area with multiple overlapping wireless networks, you may need to tinker with the router’s channel settings to get best performance. It’s usually a matter of trial and error. You log on to your router’s admin page, go to the wireless settings and randomly choose a channel and see how it goes. Run some file copy tests. See what kind of reception you get. There are some things you can do to speed this process up, however. Many routers default to either channel 1 or channel 6, so start with channel 3, 4, 8 or higher. They’re less likely to be used. Even better, get a tool like WiFi Analyzer, an app for your Android phone available on Google Play. It gives you an overview of what other networks are in the area and what channel they’re using, allowing you to choose a channel that’s free and clear from competition.
selecting channels for your router
Wireless routers let you choose which of the available channels you’d like to use. You can switch channels to dodge congestion.

06 Upgrade your antenna

If you have a router with external, detachable antennae, you can swap them out for something with a bit better gain. At most, your factory router is likely to have antennae with 5dBi gain (and often only 2dBi), but you can replace them with an omnidirectional antennae with 7, 9, 11, 14 or even more dBi gain. This should improve the range and reception of your wireless signals. You can also look at ‘patch panel’ directional antennas. These offer higher gain and range than omnidirectional antennas, and can sometimes be useful if you need to position the antenna at the edge of your home, or if you need long-range outdoor reception.

07 Keep it away from EM interference

All electronic equipment emits EM radiation, and EM radiation is bad for radio signals. It’s best to place your router away from other electronic equipment for this reason. Don’t jam it in your AV cabinet with your other electronic gear, and most definitely do not put it near CRT TVs or monitors or on top of loudspeakers.

Don’t forget wired networking!

We’ve talked a lot about wireless networking here, but you shouldn’t forget wired networking. The fact of the matter is, as far as Wi-Fi has come it still can’t compete with a wired connection between devices. Wireless is prone to performance dips and random disconnects and almost never gets anywhere near the listed theoretical maximum in the real world. Wired connections, on the other hand, provide consistent performance, security and reliability. Straight up, a Gigabit Ethernet connection beats any type of Wi-Fi connection on every metric except mobility. If you have fixed devices and the ability to run cables between the router and them, it’s almost always worth doing so. If you’re going to the trouble of running cables, here are some tips to help things go more smoothly.
  • Ethernet has a range of 100m (and more), so don’t worry about cables being too long.
  • Many electronics stores will make cables to order, at lengths you specify.
  • The plastic casing on Ethernet cabling is waterproof, but if you’re running it outdoors it’s best to surround the cable in PVC piping to keep it safe in case of wear or rot. You can also get outdoor Ethernet cables.
  • Category 6 cabling is a better option than Cat 5e, and there’s very little price differential. Not only does it have better signal characteristics, it will be capable of handling 10 Gigabit Ethernet when it comes along. If you’re going to the trouble of running cable through wall ducts, ceiling or under floors, you may as well prepare yourself for the next evolution of Ethernet so you won’t have to do it again.
  • Tight kinks and bends in the cable can reduce its performance — this is especially true for Cat 6 cables. Try to minimise them when running cables.    
Source
Read More
Posted in Tutorials | No comments
Older Posts Home
Subscribe to: Posts (Atom)

Popular Posts

  • Call of Duty: Ghosts Review
    Developer: Infinity Ward Publisher: Activision Platforms: PC, X360, PS3, PS4, Xbox One Price: £39.99 Reviewing a Call of Duty game is a ...
  • ‘Strata’ for iOS and Android game review
    There are games that are fun. There are games that look great. And then there are games that do both. Strata is one such game that h...
  • iBuypower Chimera 4SE FX Ultimate: AMD Gaming PC
    iBuypower is offering an AMD-based system in its Chimera 4SE line, which is designed to give users serious gaming performance without a wa...
  • Review: Seagate 600 480GB SSD
    Seagate Joins the Fray It’s been quite an interesting turn of events over the past couple years in the storage industry. Whereas practical...
  • Xbox One vs. PS4: How They Stack Up Today
    Two new gaming consoles. Both very powerful. Both very ambitious. Both about to meet head to head... and do battle for your time, money an...
  • The Last Days of the DSLR
    The DLSR is everywhere. You see it around the necks of tourists, against the faces of pro photographers. Since Canon introduced the Digita...
  • Buying Guide: Find the best headphones
    If you’re looking to get more audio enjoyment from your smartphone, tablet, media player, or computer, new headphones will do wonders. And ...
  • CCBoot - LAN Boot Software for Windows
    LAN Boot Solution Background LAN boot is a technology based on IP (Internet Protocol), UDP (User Datagram Protocol), DHCP (Dynamic ...
  • Sony Vaio Tap 11 Review
    Introduction Sony's engineering chops are really showing this year, across its phones, tablets and convertibles portfolio. The Vaio Tap ...
  • Adobe Photoshop CS6 Extended 13.0 & Plugins + Textures
    Adobe Photoshop CS6 Extended 13.0 & Plugins + Textures | 3.5 GB Adobe Photoshop CS6 Extended software delivers even more imaging magi...

Categories

  • Android
  • Apple
  • Audio
  • Blogger
  • C/C++
  • Cabling
  • Cameras
  • Cases
  • CISCO
  • Cooling
  • CPU
  • Desktop
  • DNS
  • Ebook
  • Fiber Optic
  • Gadgets
  • Game
  • Google
  • Graphic Card
  • Hardware
  • HDD
  • HTC
  • HTMLCSS
  • Hyper-V
  • Intel
  • iOS
  • iPad
  • Iphone
  • IT
  • jQuery
  • Laptop
  • Linux
  • Mac
  • MacTut
  • Microsoft
  • Mobile
  • Mouse
  • Networking
  • News
  • Nexus
  • Nokia
  • Nvidia
  • OS
  • PERIPHERALS & COMPONENTS
  • Photoshop
  • Printers
  • Programming
  • Projectors
  • PS4
  • Ram
  • RedHat
  • Review
  • Samsung
  • Scanners
  • Seagate
  • Security
  • Server2008
  • Server2012
  • Servers
  • Smartphone
  • Software
  • Sony
  • Storage
  • Tablets
  • TechNews
  • Template
  • Tutorials
  • TV
  • Ubuntu
  • Voip
  • Webdesign
  • Webiste
  • WebServer
  • Win7
  • Win8
  • Windows Phone
  • Wordpress
  • Workstation
  • XBOX

Blog Archive

  • ▼  2013 (495)
    • ▼  December (35)
      • Smart Power Strip now works with SmartThings WiFi ...
      • The Last Days of the DSLR
      • Nokia Lumia 2520 has arrived, check out our hands-on
      • 2 Million Gmail, Facebook and Twitter Accounts Rep...
      • Fleksy predictive keyboard for Android exits beta,...
      • iPhone Anamorphic Lens Lets You Shoot Wider Than W...
      • Nokia Wins Ban on HTC One Mini in U.K.
      • Finally, USB 3.1 Will Feature Reversible Connectors
      • MSI Launches Small But Mighty Z87I Gaming AC and G...
      • Samsung Galaxy S5 benchmark reveals 2K screen
      • NVIDIA Fan in Bejing Builds a 6ft Replica GeForce ...
      • Are dual-booting phones the future of Android?
      • How to Block Websites in Windows 7/8 in Chrome and...
      • How to Control your Android Mobile from PC or Laptop
      • Resize Image without loosing Quality
      • AllCast for Android pushes media to Apple TV and R...
      • Alcatel Idol X+ to launch with smartwatch and smar...
      • The legend of the HTC HD2 continues; aged device r...
      • Amazon Prime Air drones revealed on 60 Minutes, ai...
      • Samsung to create 20 MP camera sensor for future f...
      • Oppo's swiveling N1 smartphone to be available wor...
      • FileMaker Pro 13 Prematurely Appears on Apple's On...
      • Sony Vaio Tap 11 Review
      • Dell preparing to squeeze 4K resolution onto a 24-...
      • Microsoft releases VideoLoops: A GIF creator tool ...
      • Pebble Smartwatch for Android and iOS Hit Amazon f...
      • 3D Printing Market Forecasted For Explosive Growth...
      • ASUS Transformer Book T100 review: a Windows table...
      • Xbox One's 500GB HDD swapped for bigger, faster dr...
      • U.S. Army Saved $130 Million by Stealing Software
      • Xbox One Scores Big on Black Friday Surpassing PS4...
      • Buying Guide: Find the best headphones
      • Sailfish OS will be available for Android users to...
      • Amazon Cyber Monday Is The Real Deal
      • Nvidia Calls PC "Far Superior" to Video Game Consoles
    • ►  November (332)
    • ►  October (12)
    • ►  September (27)
    • ►  August (2)
    • ►  July (10)
    • ►  June (42)
    • ►  May (35)
Powered by Blogger.

About Me

Unknown
View my complete profile