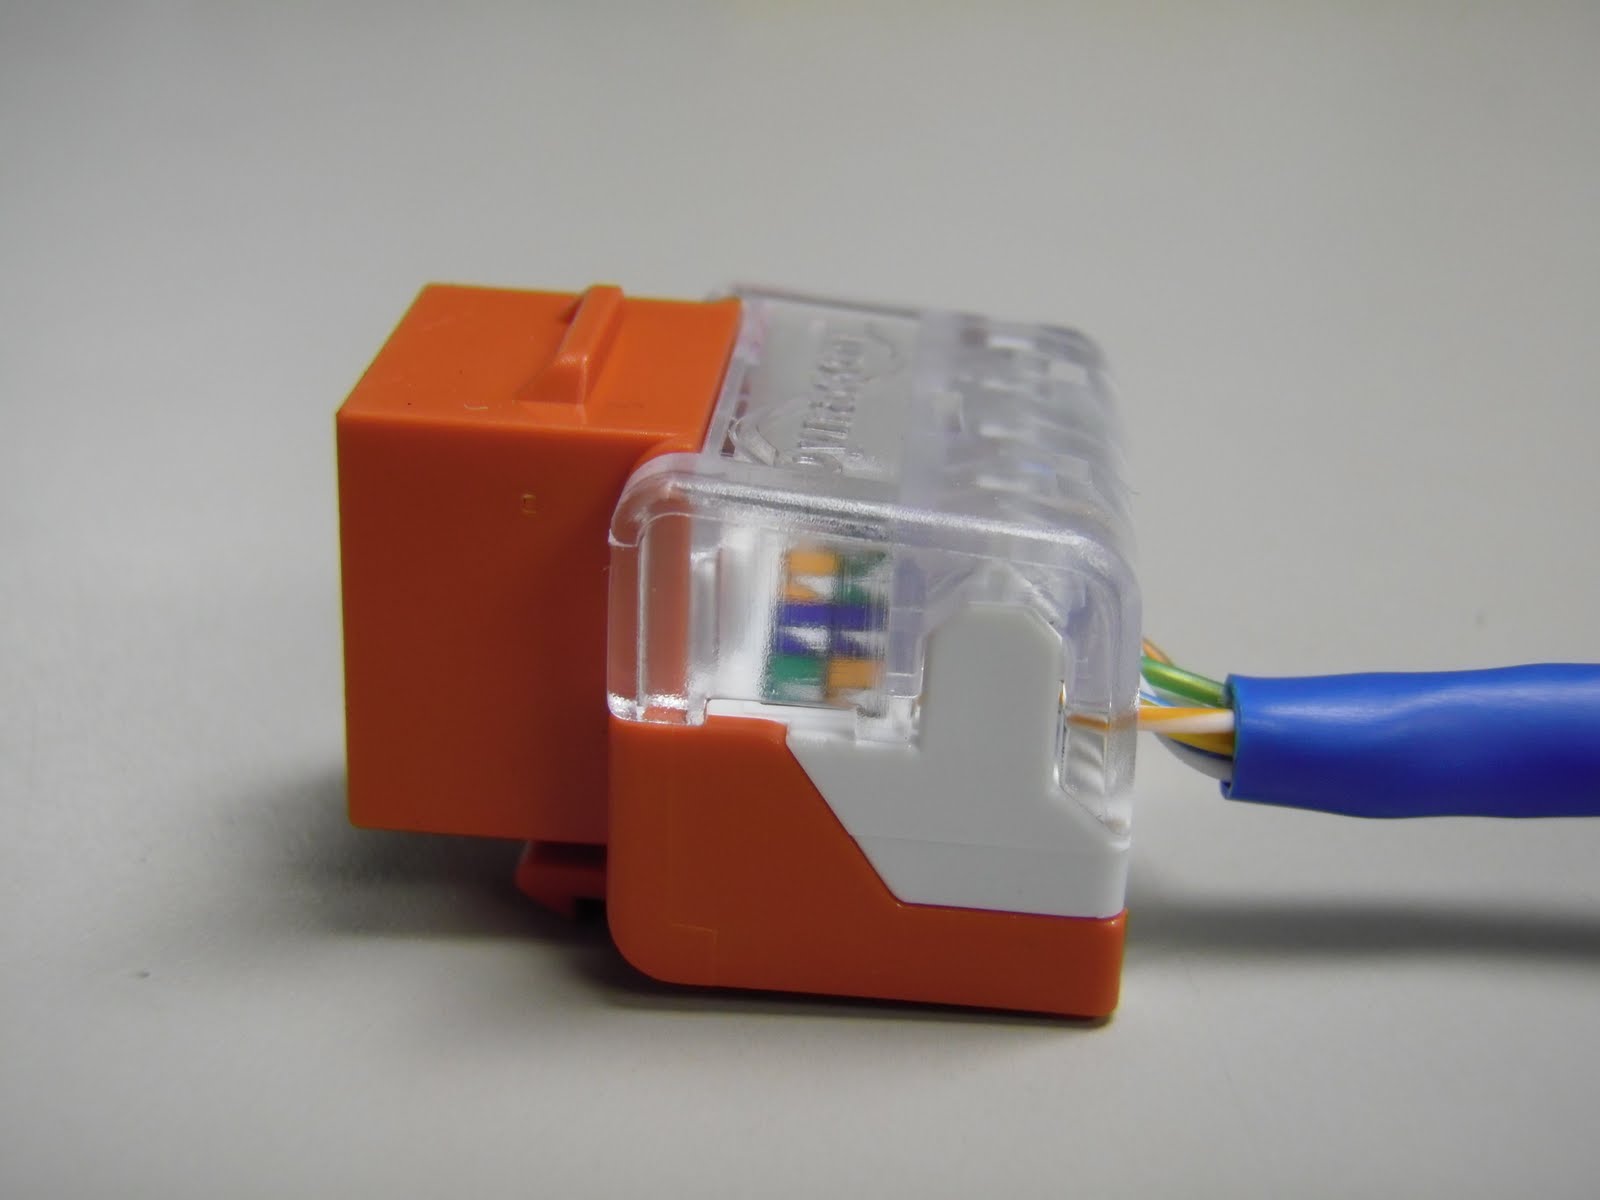
Instructions for splicing fiber optic cable with the AFL CS004162 mechanical splice kit. Watch quick overview video at bottom of post.
1.0 GENERAL
1.01 These instructions describe the operation of the SpliceConnect™ Universal Mechanical Splicing Tool. Please be sure to read these instructions carefully before proceeding.
WARNING: Always wear eye protection when handling optical fibers. Dispose of any cut or cleaved ends properly. Do not touch the wedge with bare hands.
1.02 The SpliceConnect™ CS004162 Universal Mechanical Splicing Tool Kit Contains:
• Mechanical Splicing Tool
• Instruction Manual
• Fiber Holder (900µm)
• Fiber Holder (250µm)
• Instructions Video (CD)
• Carrying Case
1.03 Tools and materials required:
• CT-30A Universal Cleaver (recommended)
• Fiber Prep Fluid
• Marking Pen
• Fiber Stripper
• Lint-free Cloth Wipes
2.0 INSTALLATION
2.01 Identify components of the kit. (see Figure 1)

2.02 Securely set the mechanical splice into the tool with the “F” logo upside down and on the left side. (see Figure 2)

2.03 Push the Red lever fully to engage the wedge into the splice. (see Figure 3)

2.04 Avoid damage to the fibers by making sure the fiber holder grooves and stripper are free of dust. (see Figure 4)

2.05 For 250µm: Mark 35mm from the end of the fiber. Strip the fiber to the mark. Clean the bare fiber. (see Figure 5)
For 900µm: Mark 35mm from the end of the fiber. Strip the fiber to the mark by removing 7mm at one time. Clean the bare fiber. (see Figure 5)

2.06 For 250µm: Place end of the fiber coating at the 10mm mark on the cleaver and cleave the bare fiber. The result is 10mm of bare fiber remaining after cleave. (see Figure 6)
For 900µm: Place end of the fiber coating at the 15mm mark on the cleaver and cleave the bare fiber. The result is 15mm of bare fiber remaining after cleave. (see Figure 6)

2.07 For 250µm: Set the fiber onto the holder with a protrusion of 25mm (10mm of bare fiber and 15mm of buffer coating). Gripping the front portion of the holder, slide the clamp downwards to lock the fiber. (see Figure 7)
For 900µm: Set the fiber onto the holder with a protrusion of 25mm (15mm of bare fiber and 10mm of buffer coating). (see Figure 7)

2.08 Set the fiber holder in the tool in line with the arrows on the rail. The fiber end should coincide with the tip of the fiber guide. (see Figures 8 and 9)


2.09 Slide the fiber holder forward until it is secured by the fiber holder lock. (see Figures 10 and 11)


2.10 Repeat steps 2.05 through 2.09 for the opposite fiber.
2.11 Insert opposite side of holder and fiber should bend on the side of the inserted holder. (see Figures 12 and 13)


(Except for 250µm to 900µm, the fiber on the opposite side of the inserted fiber holder should bend. (see Figure 14)

2.12 Press down the fiber bend and the opposite side should form a bend. (see Figures 15 and 16)


2.13 Balance the fiber bends on both sides. If the fiber bends cannot be balanced, restart the process with a new mechanical splice. (see Figures 17 and 18)


2.14 When the fiber bends on both sides are balanced, push the yellow lever to disengage the wedge. Fiber splice is completed. (see Figure 19)

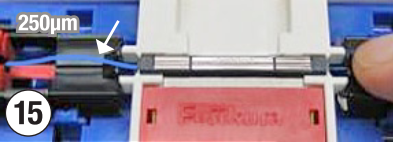
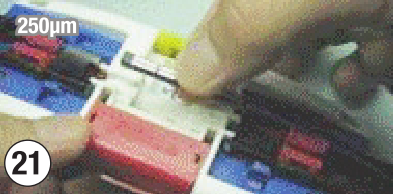
2.15 For 250µm: Release the fibers from the fiber holder by sliding the clamps towards the splice side. Make sure the fiber does not get caught by any part of the splice tool. Remove the splice gently. (see Figures 20 and 21)


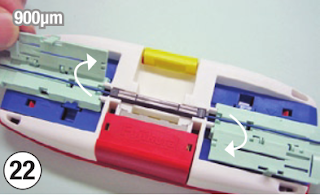
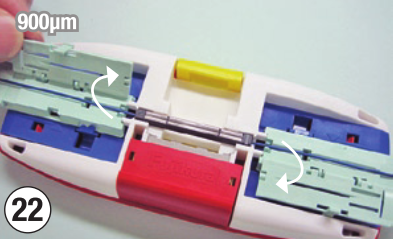
For 900µm: Release the fibers from fiber holders by opening the fiber holder covers. Make sure the fiber does not get caught by any part of the splice tool. Remove the splice gently. (see Figures 22 and 23)

2.16 Slide the fiber holder backwards and remove it from the lock. Do not keep the fiber holders locked in the tool. (see Figures 24 and 25)


1.0 GENERAL
1.01 These instructions describe the operation of the SpliceConnect™ Universal Mechanical Splicing Tool. Please be sure to read these instructions carefully before proceeding.
WARNING: Always wear eye protection when handling optical fibers. Dispose of any cut or cleaved ends properly. Do not touch the wedge with bare hands.
1.02 The SpliceConnect™ CS004162 Universal Mechanical Splicing Tool Kit Contains:
• Mechanical Splicing Tool
• Instruction Manual
• Fiber Holder (900µm)
• Fiber Holder (250µm)
• Instructions Video (CD)
• Carrying Case
1.03 Tools and materials required:
• CT-30A Universal Cleaver (recommended)
• Fiber Prep Fluid
• Marking Pen
• Fiber Stripper
• Lint-free Cloth Wipes
2.0 INSTALLATION
2.01 Identify components of the kit. (see Figure 1)

2.02 Securely set the mechanical splice into the tool with the “F” logo upside down and on the left side. (see Figure 2)
2.03 Push the Red lever fully to engage the wedge into the splice. (see Figure 3)
2.04 Avoid damage to the fibers by making sure the fiber holder grooves and stripper are free of dust. (see Figure 4)
2.05 For 250µm: Mark 35mm from the end of the fiber. Strip the fiber to the mark. Clean the bare fiber. (see Figure 5)
For 900µm: Mark 35mm from the end of the fiber. Strip the fiber to the mark by removing 7mm at one time. Clean the bare fiber. (see Figure 5)
2.06 For 250µm: Place end of the fiber coating at the 10mm mark on the cleaver and cleave the bare fiber. The result is 10mm of bare fiber remaining after cleave. (see Figure 6)
For 900µm: Place end of the fiber coating at the 15mm mark on the cleaver and cleave the bare fiber. The result is 15mm of bare fiber remaining after cleave. (see Figure 6)
2.07 For 250µm: Set the fiber onto the holder with a protrusion of 25mm (10mm of bare fiber and 15mm of buffer coating). Gripping the front portion of the holder, slide the clamp downwards to lock the fiber. (see Figure 7)
For 900µm: Set the fiber onto the holder with a protrusion of 25mm (15mm of bare fiber and 10mm of buffer coating). (see Figure 7)
2.08 Set the fiber holder in the tool in line with the arrows on the rail. The fiber end should coincide with the tip of the fiber guide. (see Figures 8 and 9)
2.09 Slide the fiber holder forward until it is secured by the fiber holder lock. (see Figures 10 and 11)
2.10 Repeat steps 2.05 through 2.09 for the opposite fiber.
2.11 Insert opposite side of holder and fiber should bend on the side of the inserted holder. (see Figures 12 and 13)


(Except for 250µm to 900µm, the fiber on the opposite side of the inserted fiber holder should bend. (see Figure 14)

2.12 Press down the fiber bend and the opposite side should form a bend. (see Figures 15 and 16)

2.13 Balance the fiber bends on both sides. If the fiber bends cannot be balanced, restart the process with a new mechanical splice. (see Figures 17 and 18)


2.14 When the fiber bends on both sides are balanced, push the yellow lever to disengage the wedge. Fiber splice is completed. (see Figure 19)

2.15 For 250µm: Release the fibers from the fiber holder by sliding the clamps towards the splice side. Make sure the fiber does not get caught by any part of the splice tool. Remove the splice gently. (see Figures 20 and 21)

For 900µm: Release the fibers from fiber holders by opening the fiber holder covers. Make sure the fiber does not get caught by any part of the splice tool. Remove the splice gently. (see Figures 22 and 23)

2.16 Slide the fiber holder backwards and remove it from the lock. Do not keep the fiber holders locked in the tool. (see Figures 24 and 25)


Watch the mechanical splice video overview